
Beer can chicken is one of those grilling techniques that immediately gets people talking. You set a whole chicken upright over an opened can of beer and cook it with the lid closed over indirect heat. According to the familiar story, the beer steams the chicken from the inside, keeps the meat juicy and even adds beer flavor.
But does it really work that way? In this guide, we look at what the beer can actually does, why people may still be convinced they can taste a difference and which benefits the upright cooking position genuinely offers. Then you can decide whether beer can chicken on the grill is a useful technique or simply a very successful gimmick.
Disclaimer: All opinions expressed are personal and honest. As an Amazon Associate, I earn from qualifying purchases at no extra cost to you. This post contains affiliate links. Your support through these links helps keep this blog running!
The gimmick effect of beer can chicken
One important reason beer can chicken became so popular is that it is a genuine attention-grabber. A whole chicken standing upright on a beer can looks funny, slightly outrageous and impressive on the grill. It makes sense that many barbecue fans want to try the method at least once.
But is beer can chicken more than a gimmick? The usual claim is that beer evaporates from the can and makes the chicken juicier from within. Meathead from AmazingRibs investigated that claim and reached a different conclusion: the beer contributes very little to either flavor or juiciness. Even so, plenty of people remain convinced they can taste the difference. That is not only about the cooking method; psychology plays a role as well.


The power of psychology
Although the myth has been busted, I would not immediately argue with someone who says they taste a difference. My background in applied psychology taught me how strongly expectations can shape flavor perception. If we are convinced in advance that a cooking method will produce something special, we may genuinely experience the result differently.
You may recognize the effect from another setting. While traveling, you taste an amazing wine at a local vineyard. The surroundings, the relaxed atmosphere and the winemaker’s story all enhance the experience. You buy a few bottles, but once you open one at home, some of the magic seems to have disappeared.
A chicken perched on a beer can can create a similar effect. The cook looks bold and surprising. Your guests expect something unusual, and that expectation helps shape what they ultimately taste. It does not make their experience any less real, but it also does not mean beer has physically moved into the meat.
The myth, busted
Fans of beer can chicken often say steam from the can keeps the meat tender and adds flavor. In practice, however, the beer remains well below its boiling point. The relatively cool chicken surrounds much of the can and slows the heating of the liquid. Without boiling liquid, there is no meaningful amount of steam available to moisten the bird from the inside.
The can also sits deep inside the cavity. Even if a small amount of vapor formed, it would reach only a limited part of the interior. At the same time, the can blocks some of the airflow through the cavity. Any juiciness people notice is therefore more likely to come from the cooking method, the final internal temperature and their expectations than from the beer itself.

The real benefits of beer can chicken
So, does that mean there is no point in making beer can chicken? I would not go that far. The benefits simply do not come from the beer. Cooking the bird upright with the lid closed over indirect heat can produce several useful effects. A sturdy chicken roaster gives you those same benefits without relying on a beverage can.
A better chance of crisp skin
With the chicken standing upright, hot, relatively dry air can circulate around much of the skin. Fat underneath the skin can render more freely and run down the bird, helping the surface dry and brown.
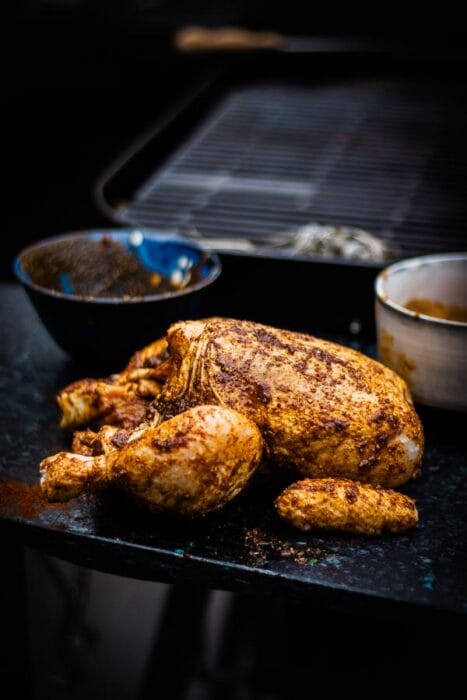
Pat the chicken thoroughly dry before seasoning, and do not mix the rub with a heavy coating of oil. I did use oil on the chicken in these photos, but afterward I found it was not the best choice for truly crisp skin. Apply the seasoning directly and evenly instead.
More even cooking around the exterior
Because the chicken sits beside the heat source or behind a heat shield, hot air can circulate around the meat. Heat distribution is usually fairly even in a kamado or pellet grill fitted with a heat deflector. If you use a kettle grill with the coals banked to one side, consider rotating the chicken halfway through. Without a heat shield, the side facing the coals receives more radiant heat and will brown faster.
Breast and thighs finish closer together
On an upright chicken, the thighs sit closer to the heat source than the breast. That can be helpful because the thighs tolerate more heat and time, while the lean breast dries out more quickly. The position may reduce the difference in doneness, although you still need to check several locations with a thermometer.
It is still great show cooking
No one can deny that this technique looks striking. Guests who are less familiar with barbecue will be surprised when they see an upright chicken on the grate. The presentation and the story around the cook become part of the overall experience—and may even influence how delicious the result seems.


How to make beer can chicken
Beer can chicken looks spectacular, but the technique is not especially difficult. Season the whole chicken as described in the recipe and work some of the seasoning underneath the skin over the breast and thighs. This flavors the meat directly instead of seasoning only the exterior.
If you want the classic presentation, drink or pour out about half of the beer. The beer style makes little difference in this application. A safer and more stable option is a purpose-built chicken roaster. Set the chicken upright over indirect heat and cook it with the lid closed at approximately 355°F / 180°C.
Check doneness with an instant-read meat thermometer. Insert it into the thickest parts of both the breast and thigh without touching bone. Continue cooking until the lowest reading reaches at least 165°F / 74°C. Let the chicken rest for about 10 minutes before carefully lifting it from the stand and carving.


Risks and safe handling
The chicken, the holder and any liquid left inside become extremely hot. Removing a tightly fitted chicken can therefore be awkward. Move the bird to a stable, heat-resistant surface first and wear gloves that protect against both heat and hot liquid like these one Amazon. Have someone steady the holder with long tongs while you carefully lift off the chicken.
A commercial beverage can is not designed to be cookware. Its interior lining, exterior printing and coating are intended for normal beverage storage, not prolonged heating on a grill. I used a traditional beer can once for this photo shoot to illustrate the familiar method. If you make the recipe yourself, I recommend a stable, food-safe chicken roaster.

Conclusion
The myth behind beer can chicken does not hold up: the beer does not steam the chicken from within and contributes very little beer flavor. The dish can still turn out juicy and delicious. Its real advantages come from the upright position, indirect heat, careful temperature control and memorable presentation.
If you want even cooking without using a can, spatchcocking a whole chicken is an excellent alternative because it exposes the breast and thighs more evenly to the heat. For a different whole-bird project, try my Peking-style whole BBQ turkey with soy glaze.
If you truly want beer flavor in the meat, use beer in a brine, marinade, glaze or sauce instead. That has far more impact than a half-full can inside the cavity; my beer-glazed chicken wings show a more effective approach. If your main goal is to impress your guests, use a safe chicken roaster, monitor the internal temperature and enjoy the show.
Recipe: beer can chicken with Magic Dust rub

Beer can chicken with Magic Dust rub
Equipment
- Covered grill or smoker
Ingredients
For the chicken
- 1 whole chicken giblets removed
- 1 12 fl oz can light beer optional; pour out half, or fill a purpose-built roaster as directed by its manufacturer
- 1-2 tbsp Magic Dust BBQ rub as needed; recipe below
For the Magic Dust BBQ rub
- 8 tbsp paprika
- 4 tbsp fine salt
- 4 tbsp light brown sugar
- 4 tbsp chili powder American-style chili powder blend
- 4 tbsp ground cumin
- 4 tbsp garlic powder
- 2 tbsp ground black pepper
- 2 tbsp mustard powder
- 2 tbsp cayenne pepper reduce to taste for a milder rub
Instructions
Make the Magic Dust rub
- Combine the paprika, salt, brown sugar, chili powder, cumin, garlic powder, black pepper, mustard powder and cayenne. Break up any lumps and mix until evenly combined.
Prepare the chicken and grill
- Set up the grill for indirect cooking at approximately 355°F / 180°C. If you use a kettle grill, bank the coals to one side. On a kamado, install the heat deflector.
- Remove the chicken from its packaging, take out the giblets and pat the bird thoroughly dry with paper towels.
- Carefully loosen the skin over the breast and thighs. Apply the Magic Dust directly to the meat underneath the skin, inside the cavity and evenly over the exterior. Do not coat the skin with a heavy layer of oil if crisp skin is your goal.
- For the traditional presentation, pour out or drink approximately half the beer. For a safer and more stable setup, use a purpose-built chicken roaster and follow the manufacturer’s instructions for adding liquid, if required.
- Lower the chicken carefully onto the roaster so it stands upright with a stable base. Tuck the wing tips back if they are exposed.
Cook and rest
- Place the upright chicken in the center of the indirect zone and close the lid. Cook for approximately 1 1/2 hours. If the heat comes mainly from one side, rotate the chicken halfway through for more even browning.
- Check the thickest part of the breast and the innermost part of the thigh with an instant-read thermometer, avoiding the bone. Continue cooking until the lowest reading reaches at least 165°F / 74°C.
- Move the chicken and roaster to a stable, heat-resistant surface. Rest for 10 minutes. Wearing heat- and liquid-resistant gloves, have someone steady the holder with long tongs while you carefully lift off the chicken. Carve and serve.
Notes
Frequently asked questions about beer can chicken
Click a question to reveal the answer.
Does the beer make the chicken juicier?
No. The beer remains well below its boiling point during the cook, so it does not produce enough steam to noticeably moisten the meat. Juiciness depends much more on the cooking method and the final internal temperature.
Does beer can chicken taste like beer?
The beer in the can contributes very little flavor to the meat. Expectations and presentation can influence how people perceive the result. For noticeable beer flavor, use beer in a brine, marinade, glaze or sauce instead.
What grill temperature should I use for beer can chicken?
Set up the grill for indirect heat at approximately 355°F / 180°C. Keep the lid closed so hot air can circulate around the upright chicken. On a kettle grill with the coals banked to one side, you may need to rotate the bird halfway through.
What internal temperature should beer can chicken reach?
Cook the chicken until the lowest reading reaches at least 165°F / 74°C in both the thickest part of the breast and the innermost part of the thigh. Check several locations without touching bone.
Is it safe to cook chicken on a beer can?
A beverage can is not designed to be cookware. A stable, food-safe chicken roaster is the better choice. It creates a safer setup and usually makes it easier to remove the cooked chicken.


